


PiccoloNamek
Headphoneus Supremus
- Joined
- Apr 1, 2006
- Posts
- 3,021
- Likes
- 59
I have wanted to make a thread like this for a while now, but have kept putting it off for one reason or another. With all of the threads about EQ popping up recently, I think it is finally time I post this.
This thread is for people who want to get the highest possible fidelity from their headphones. A lot of what I am about to explain will be obvious to more experienced members. But there are people out there who do not even know how to obtain their own pink noise and sine wave samples, let alone equalize with them. If you are one of those people, this thread is for you!
I am a strong proponent of properly applied equalization. When used correctly, equalization can make a good headphone great, and a great headphone superb. And most headphones need at least some equalization. In my 3 years since joining Head-Fi, having heard and used many different types of headphones, I have noticed a phenomenon that has occurred with every headphone, ear bud, and IEM I have ever used. I first read about it at Siegfried Linkwitz's page some years ago, where he discusses his method for equalizing the Etymotic ER4S. He states that "an acoustic impedance mismatch between transducer, ear canal, and eardrum" is causing a resonance that results in a large peak at 7.5kHz, coloring the sound. He and a friend of his also experienced the same effect when using a pair of old Sennheiser HD414s. (For the record, I'd wager good money this is the primary reason why so many people cannot tolerate the ER4S.)
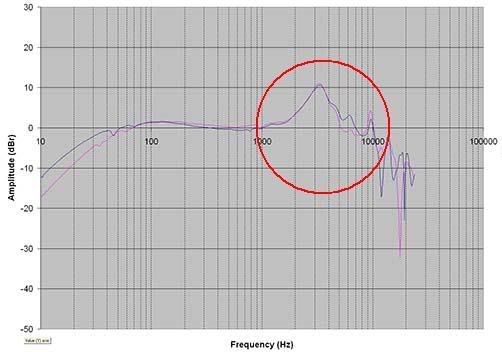
I too have noticed this, with my HD650s, ER4Ss, and even my STAX headphones. Anyone is susceptible to this effect, and unless your headphone's inherent frequency response happens to match your personal resonance frequency, you are likely already experiencing the effect. Even very high-end headphones will exhibit this problem. Take for example this Headroom graph of the AKG701:

It looks more or less neutral, right? But in reality, the actual perceived response looks more like this:
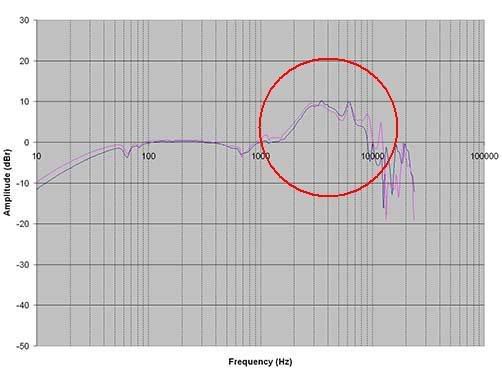
This graph is the raw frequency response data from HeadRoom's own dummy head, before the dummy head's HRTF (Head-Related transfer function) data has been subtracted from it. While it is not at all indicative of the headphone's actual frequency response, it is indicative of the dummy head's perceived response, that is, what the dummy head actually heard at the time of testing, which is what matters. And the dummy head's perceived response is very interesting indeed. Look at these graphs:
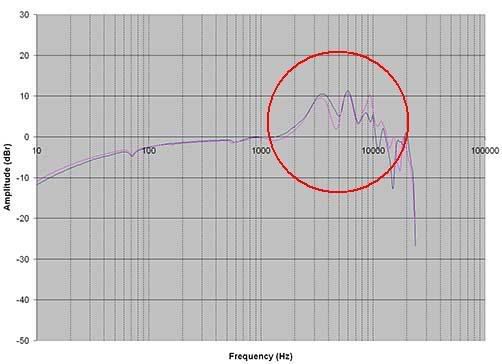
The top one is the raw data from the DT880, the bottom one is from the HD650. Notice that they both have a peak in the upper midrange, just like the K701, and at the same amplitude as well. Not only do they have a peak in the upper midrange, but the high frequencies in general are greatly uneven and exaggerated. And the same anomaly will be present in any headphone you could think to test. Because these graphs represent the frequency response of the headphone before the dummy head's HRTF has been subjected from it, it is they, not the nice graph at the top, that most represent what you will actually hear when using these or any headphone. Look at them. Is that really how you want your music to be portrayed? A large peak in the upper midrange drastically colors the sound and strongly masks the high frequencies, causing an overall muddiness and a lack of clarity. Cymbals, strings, and other instruments with high frequency content and/or overtones will be overrepresented, and their sound will be distorted and unnatural. Too much hi-mids and treble distort the perceived distance of the sound. Equalizing the high frequency response restores realism and spaciousness.
This tutorial assumes several things:
1. That you would like to equalize your headphones to a flat or nearly flat response, either to listen to them that way, or to use that as a reference point for further equalization.
2. That you have at least a mid to high-end pair of headphones with a relatively smooth response. (a headphone with a very jagged response, like Grados for example, will be more difficult to equalize to flat than a pair of Sennheisers, AKG or STAX). You can equalize any headphone with this technique, but some will be more challenging than others.
3. That you have an audio playback program that supports the use of a parametric equalizer of some kind, or a hardware parametric equalizer. I will provide links to several good software EQs at the end of this post.
There are several things you will need.
1. A sample of Pink noise, a sine wave sweep, and an ingenious little program called "SineGen". I will provide these at the end of the post. The reason pink noise is often used for equalization (especially equalization by ear) has to do with its unique properties and the properties of the human ear. Here is an excerpt from Wikipedia concerning pink noise:
Quote:
This means that if you equalize pink noise so that every frequency sounds equally loud, your headphones will have an essentially flat response, and will sound as good as they possibly can with all types of music. The sine wave generator will be used in conjunction with the pink noise. It will allow you to find response peaks with great precision by sweeping the frequency of the waveform up and down and listening for increases in amplitude on certain frequencies.
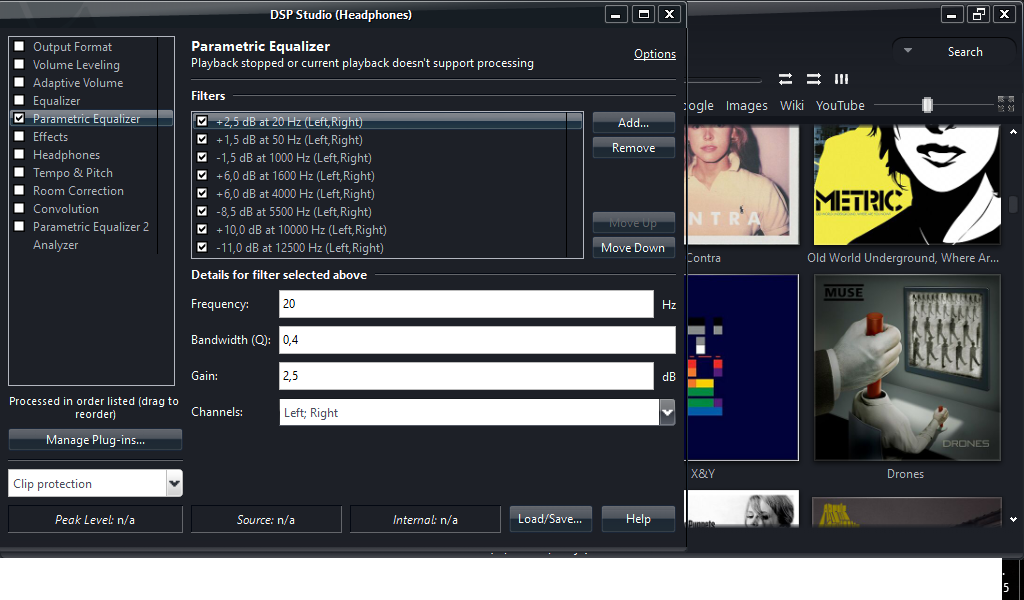
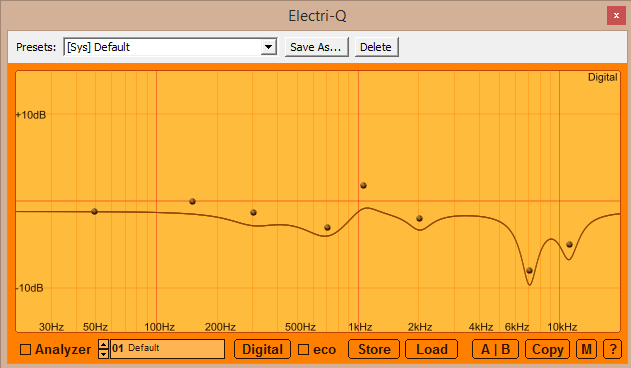
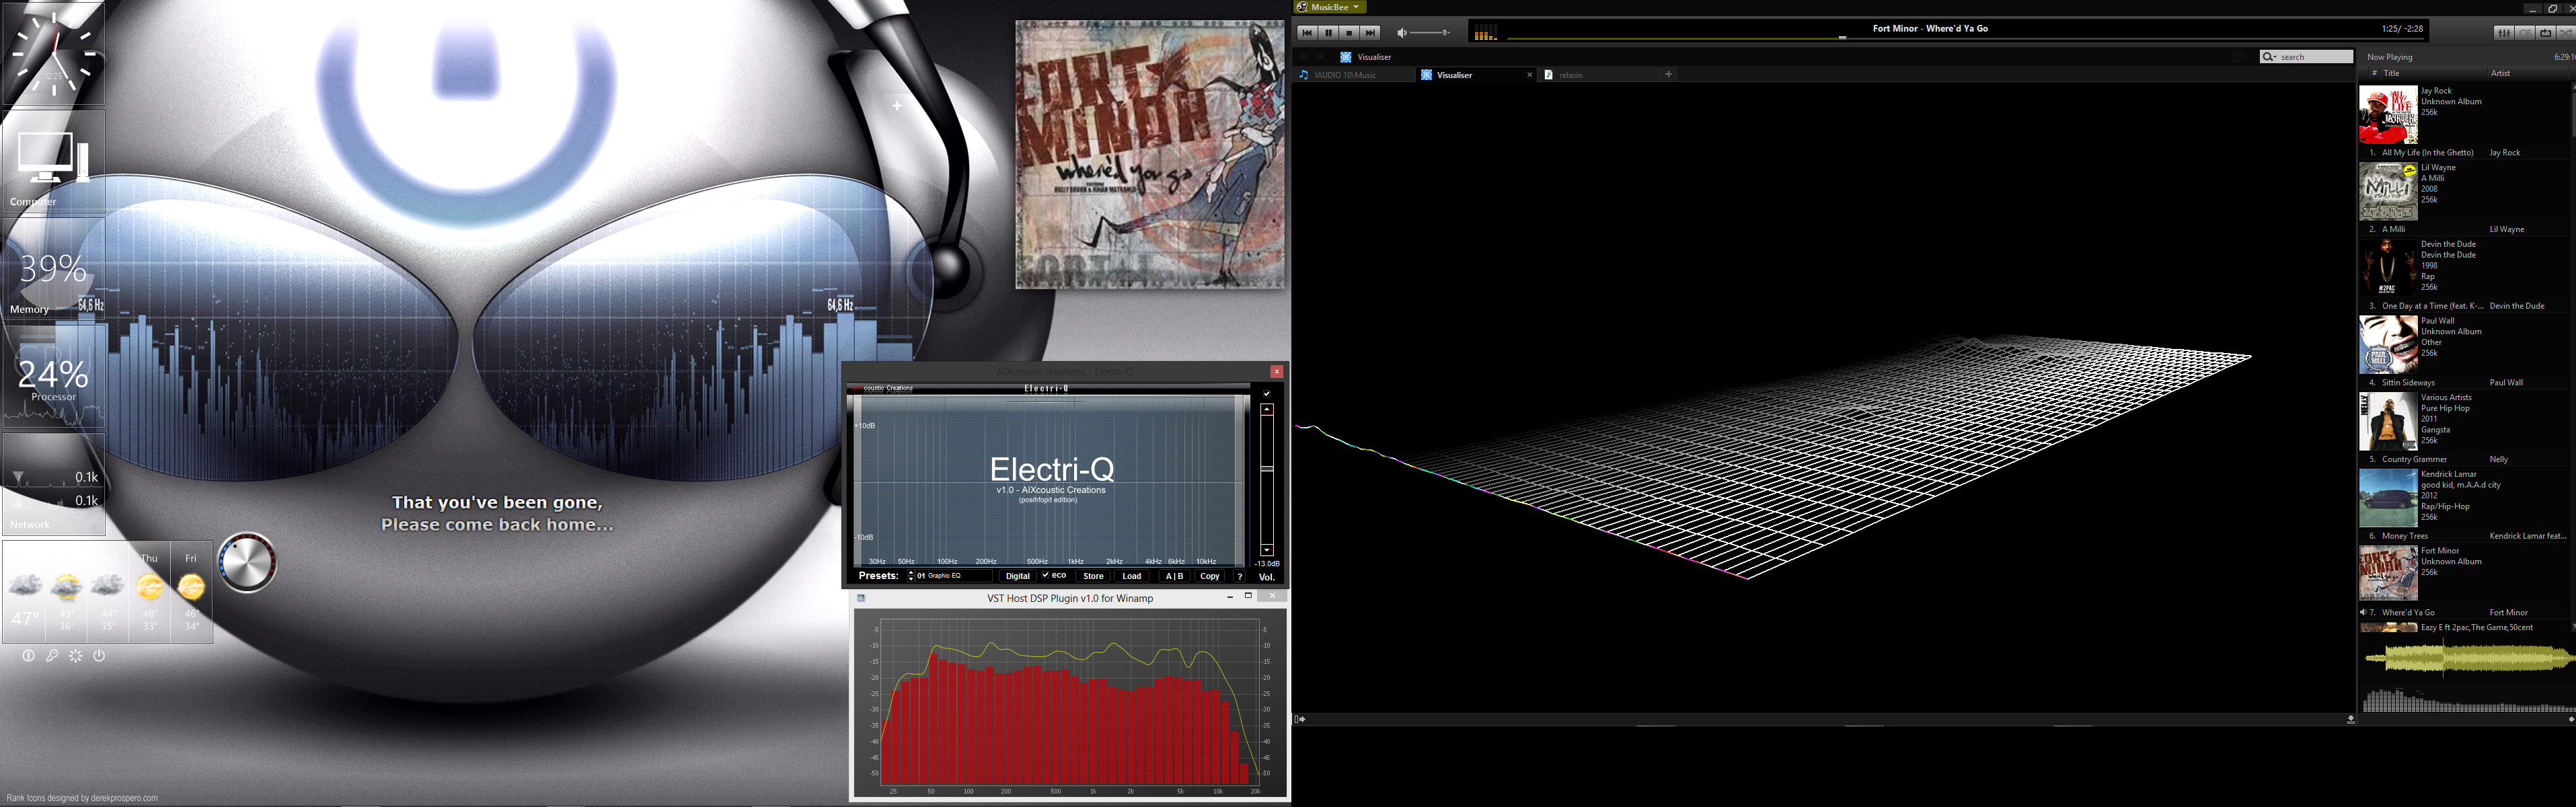
2. A good parametric equalizer. A graphic equalizer is not accurate enough for what we are about to do. There are several excellent PMEQs available for use with programs such as Winamp or Foobar2000. In my opinion, the best one by far is Electri-Q. Is has the most features and is without a doubt the most intuitive to use, with its WYSIWYG visual interface. At the bottom of the page I have included a link to the free version. (Note that it lacks many of the features of the full version.) A hardware parametric equalizer will work just as well and has the added advantage of applying the response to all of your audio, not just audio played in your media player.
3. Patience. You will not get the perfect response on the first try. It may take a while to tweak and perfect your personal response curve for a particular headphone. But the results are well worth it and you will be surprised that you actually used to listen to them unequalized.
Now, to begin. For now we are primarily going to focus on removing peaks, rather than filling notches. Peaks are far more noticeable and detrimental. Any notches that you find can be filled in later. I am also going to focus on the equalization of high frequencies in this tutorial, because I believe that high-frequency response peaks are far more detrimental than bass peaks. That, and most headphones have a relatively smooth (if not quite flat) bass response. A small bass boost will not harm the sound and can even make it seem more natural. That being said, this technique can be used for any frequency range and you should feel free to equalize the bass and mid frequencies in the same manner you do the highs.
Now, the first thing you will need to do is load up several average volume songs, and set the volume to your normal listening level. Our perception of high and low frequencies increases with volume, and it is important to create our equalization with this in mind. Once you are finished, load up the sine wave generator. By clicking the "Power" button and moving the frequency slider up and down, you will generate a sine wave that is smoothly sweepable by hand. Listen very carefully and try to determine where there are sharp, sudden increases in volume. The bass should be more or less smooth, with peaks in the response becoming noticeable after 1kHz or so. Pay careful attention to the area between 6 and 8kHz, as in my experience most ear canal resonances occur in this area. (My personal resonance is usually around 7400hz. Linkwitz's was 7500hz, and his friend's was 6800hz, although depending on the headphone/bud in question it could be as low as 5kHz. There will probably be more than one peak. Listen carefully!) Using SineGen, it should be a very simple task to determine the center frequencies of the peaks. Once you find a group of frequencies that are noticeably louder than the surrounding frequencies, use the up and down arrow keys to slowly search up and down until you find the loudest frequency. This is the center of the peak. Keep in mind that you have the ability to create a list of frequencies by selecting one and clicking the plus button. Each frequency can have its own amplitude setting. Once you have found the resonant peaks, it is possible to create a list that contains a reference frequencies (say 500hz and 1000hz) to compare to the resonant frequency at several different amplitudes. Here, take a look:
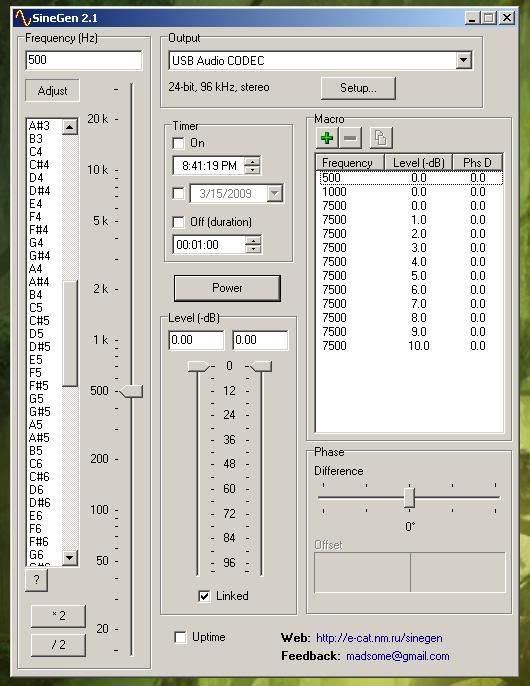
Here I am comparing 500 and 1000hz to different levels of 7500hz. Higher level numbers equal lower amplitudes (kind of counter intuitive, but whatever). By quickly switching back and forth between my reference frequencies and the resonant frequency I can quickly discover which amplitude is the correct one and create my equalization based on that.
Now it is time to get down to business. Load up your audio playback program and parametric EQ, and open the pink noise file. There are three settings that you can alter with parametric equalizers. The frequency you are working with, the amplitude of the cut or boost, and the width of the effect. Every PMEQ plugin works differently, and I cannot give instructions for all of them, so you will have to figure out some things for yourself. But I can guide you a little. What you will want to do is create a peaking filter with it's center frequency being the center frequency of the peak you found using SineGen. For example, if the effect is occurring at approximately 7.5kHz, place the center there. When you are ready, begin lowering the amplitude of the peak filter one decibel at a time, until you can no longer hear the high frequency peak. Now, here is the important part. Load up a song and listen to it for a moment. Listening to pink noise for extended periods of time is hard on the ears, so we will take a moment to cleanse your aural palette, so to speak. In the meantime, try taking the equalizer in and our of the signal path a few times to see what kind of effect the resonance reduction has on your music. When you are finished, reload the pink noise sample and move the amplitude slider for your center frequency back up one or two decibels. You should be able to hear the difference. Now, continue moving it downward again until you can no longer hear the "prominent hiss". In all likelihood, your setting will be lower now than it was before you loaded the song.
Once you are finished and are satisfied with your setting (it will probably be around -7 to -8db; the notch depth does not seem to vary much between individuals) we will need to adjust with width of the notch we have created. Set the notch to it's narrowest setting, and gradually increase its width in small increments until you can no longer hear the anomaly. Load up a song to rest your ears, and then repeat the process until you are satisfied that you have the correct width. At this point you may want to check the amplitude of your notch again. Once you are finished with all of this, load up the sine wave sweep file (included with the pink noise) in your media player and play it. With any luck, the response peaks you noticed earlier will be either gone or significantly reduced. Try comparing the output of your media player with the output of SineGen. With practice and time, you will be able to achieve a uniform response. If you have a hardware parametric equalizer, you can use the output of SineGen to directly create your equalization by tuning your equalizer in real time while sweeping the frequency slider.
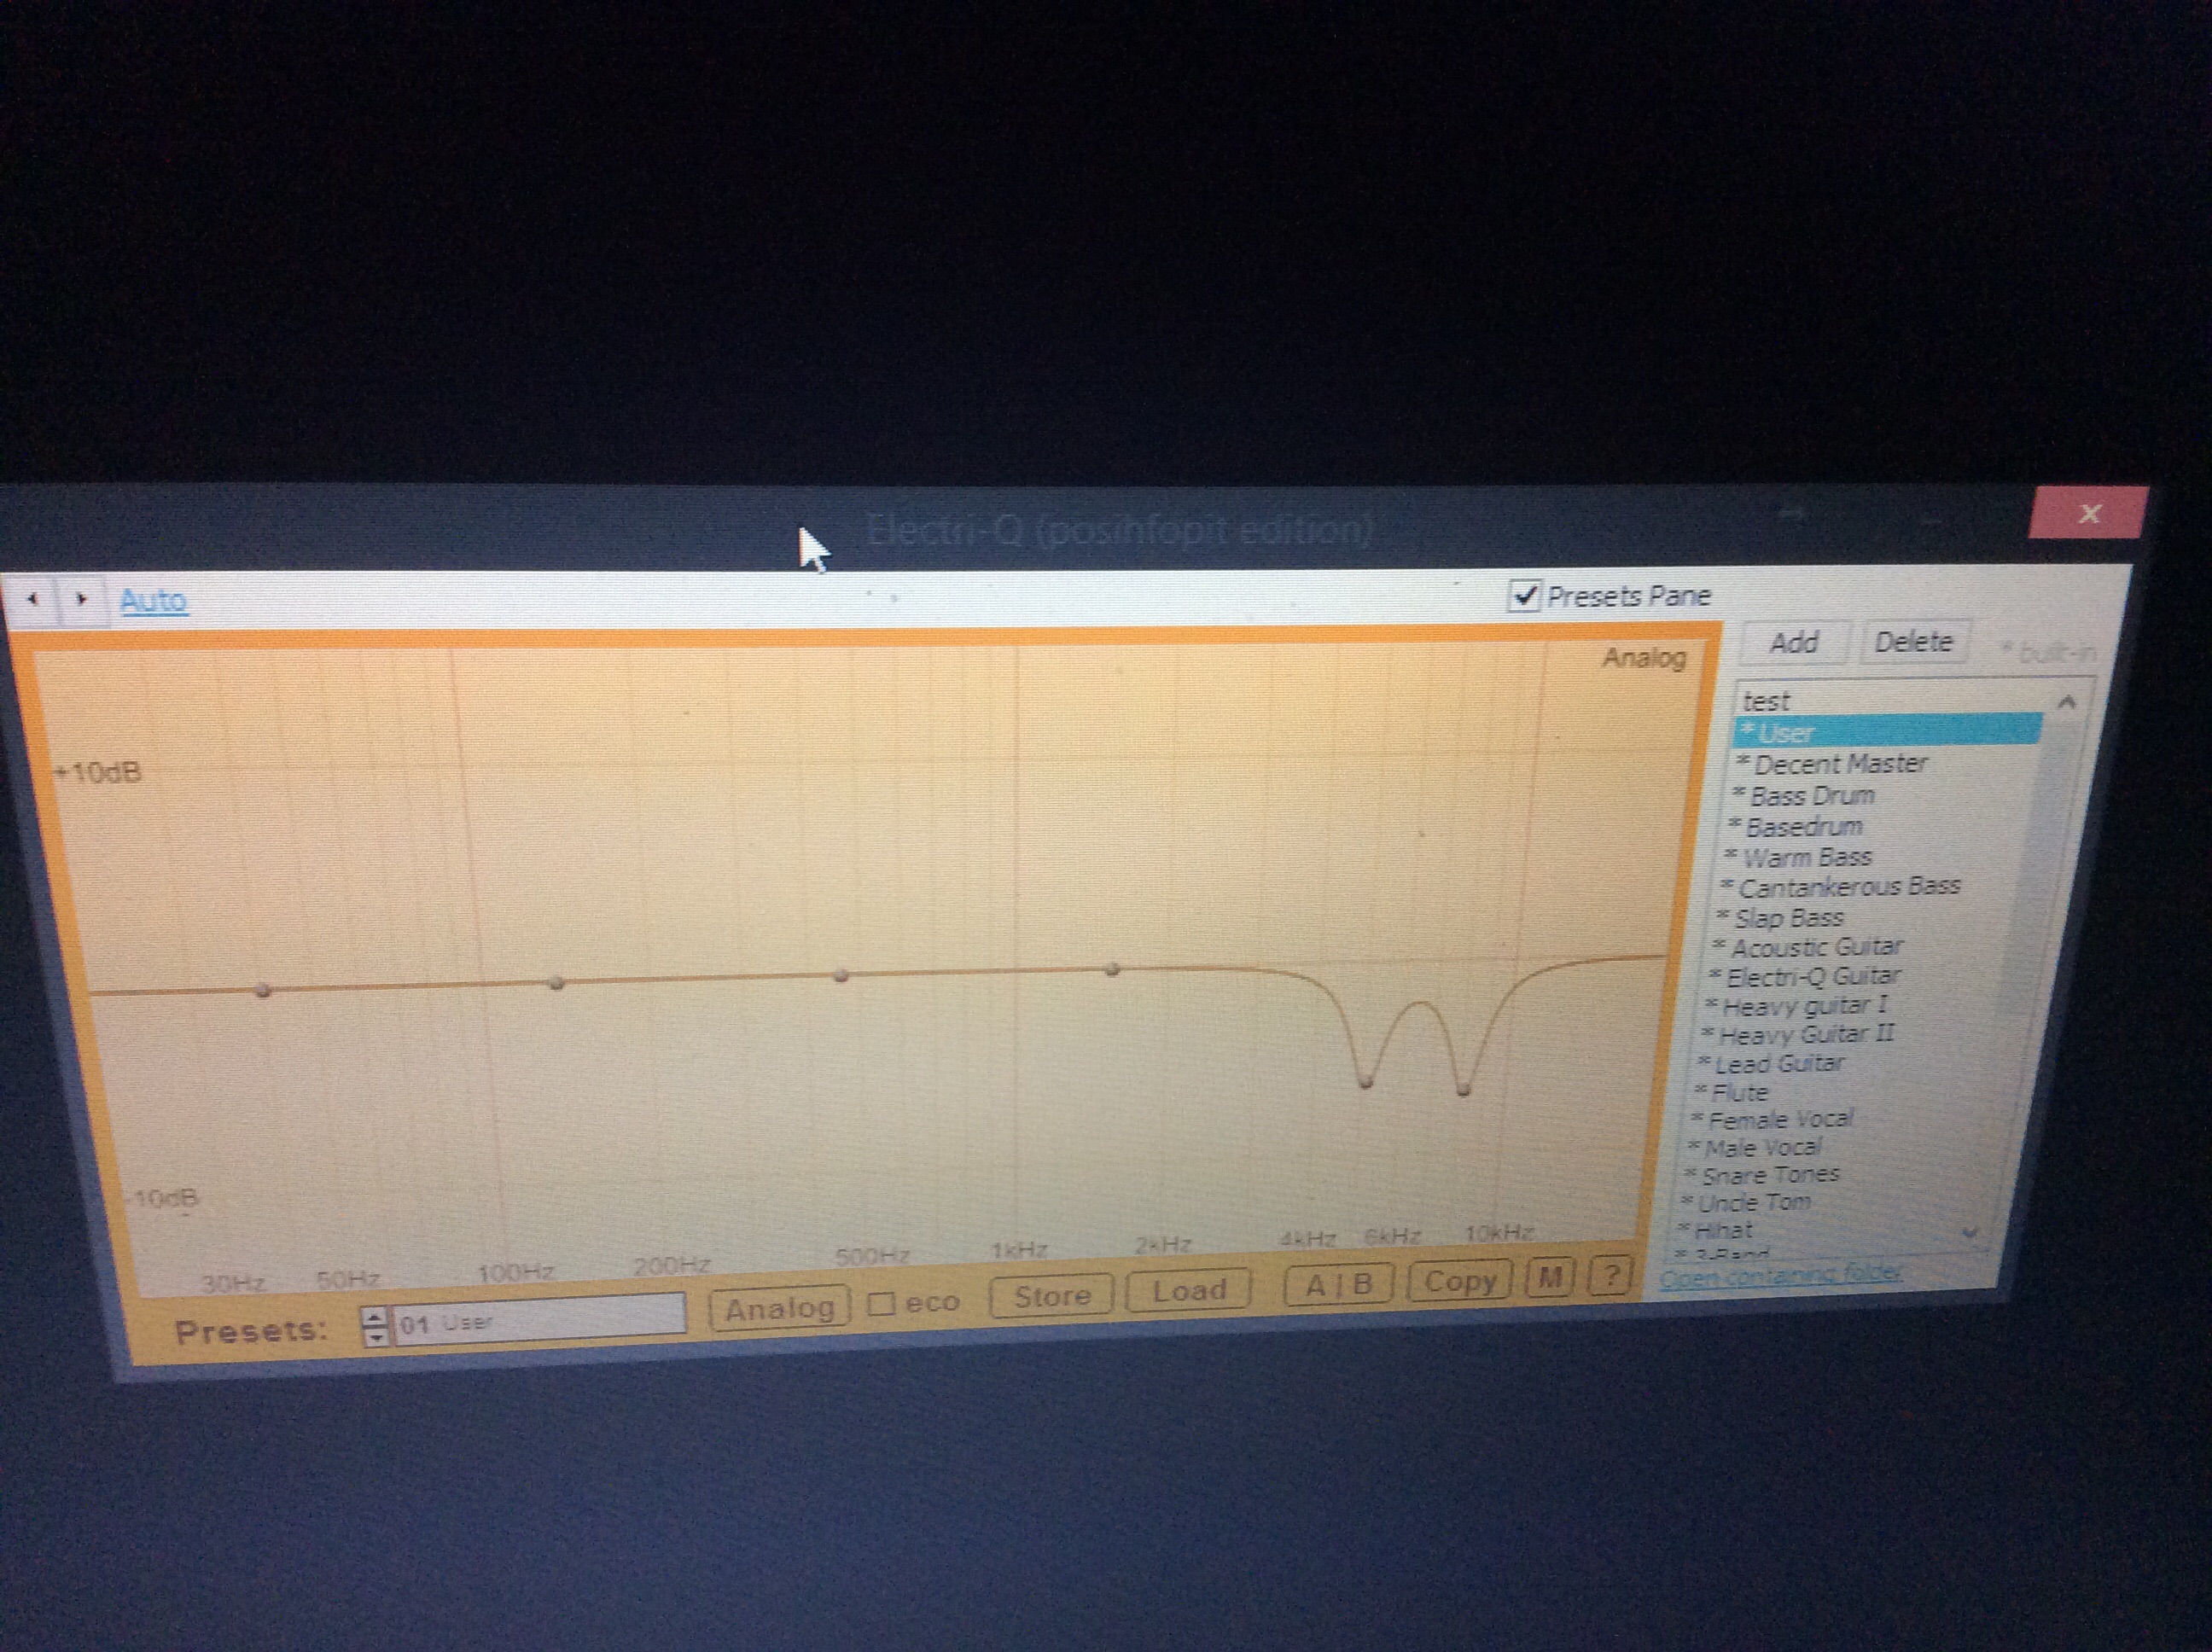
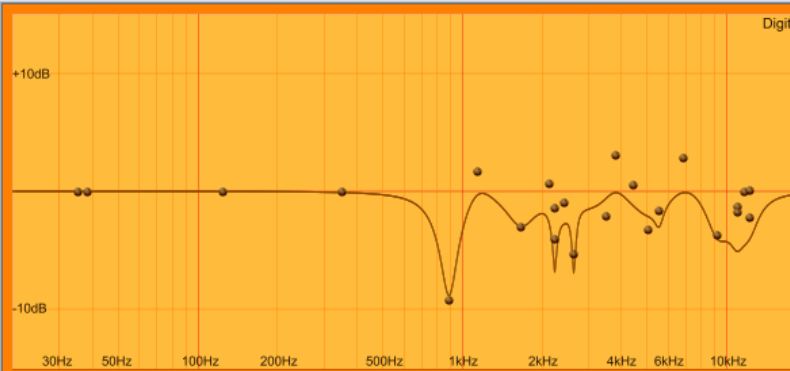
As I mentioned earlier, there may be more than one peak, and the process will need to be repeated for all of them. Using the exact technique described above, this is the response that I currently have for my STAX headphones:
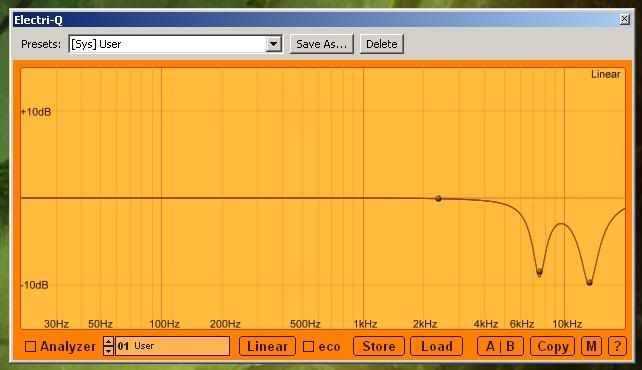
Mode: Linear Phase
Peak type: S-plane type II
(I always use the same mode and peak type, BTW)
-8.0dB at 7450Hz with a BW of 0.750
-9.5db at 12850Hz with a BW of 0.950
(Note that this response will probably work with any Lambda series headphone, from the original Lambda all the way to the SR-404, because they all have the same formfactor and, hence, the same transducer-to-eardrum distance.)
If you want to know what the perceived unequalized frequency response of my headphones was, just imagine those notches as peaks! As you can see, this is a huge change from a normal, flat response! Keep in mind that as electrostatic headphones, the actual transducers probably have an essentially flat response. A headphone that already had peaks in the response would be even worse. Setting either of the center frequencies back to 0dB reveals an extremely prominent coloration of the sound, which is blatantly noticeable when listening to pink noise. When listening to music, setting the 7400kHz notch to 0 reveals an overall sandy coloration to the sound, with louder than normal cymbals and string overtones. Male and female vocals are strongly affected and sound artificial. Setting the 12.85kHz notch to 0 reveals a gross prominence of very high frequency overtones of strings and voices, and causes metal instruments such as cymbals, triangles, bells, etc to sound artificially shiny and tingy. Turning both of them off results in a stupidly exaggerated high-frequency response overall.
The end effect of such a frequency response is a constant bombardment of high-frequency information and a loss of true fidelity. Unless you've spent a good deal of time with a system that has a very flat response (such as a good pair of studio monitors), it is difficult to appreciate just how much of an effect it has on your music. So here is my advice to you: if you actually go through with this and create your own personalized response, do not constantly change back and forth between it and the unequalized response to compare the two. Instead, spend a week or so listening only to your equalized response. Then, load up the pink noise file (or a song, although the noise will have a greater effect) and after a few seconds of listening, turn the filter off. You will almost certainly be amazed. Amazed at just how badly your headphones were distorting the sound, and amazed that you actually listened to them that way! I know I am! In addition to hearing music with greatly increased fidelity, I have also been able to increase my overall listening volume; without the high volume high-frequency peaks, my comfortable listening level is a few dB higher than it was before.
Before I close, I have a final request: if anybody should actually go through with this, I request that you post your results for everyone to see. If you choose to use Electri-Q, post a picture of your response. If you used another program, tell us which one and post the settings you use. Not only would it be interesting to see the different personal responses of people's ears, but the information will be useful as starting points to others who want to equalize their own headphones.
Now, here are some useful links:
Pink noise and sine wave
SineGen sine wave generator
Electri-Q parametric equalizer Freeware Version
Shibatch parametric equalizer for Winamp (Can be used with Foobar if you have a Winamp to Foobar wrapper. See below.)
NWEQ parametric equalizer plugin (Relatively intuitive to use, no visual feedback on waveform changes, though.)
NyquistEQ Parametric Equalizer
George Yhong's VST wrapper for Foobar
Winamp bridge for Foobar2000
This thread is for people who want to get the highest possible fidelity from their headphones. A lot of what I am about to explain will be obvious to more experienced members. But there are people out there who do not even know how to obtain their own pink noise and sine wave samples, let alone equalize with them. If you are one of those people, this thread is for you!
I am a strong proponent of properly applied equalization. When used correctly, equalization can make a good headphone great, and a great headphone superb. And most headphones need at least some equalization. In my 3 years since joining Head-Fi, having heard and used many different types of headphones, I have noticed a phenomenon that has occurred with every headphone, ear bud, and IEM I have ever used. I first read about it at Siegfried Linkwitz's page some years ago, where he discusses his method for equalizing the Etymotic ER4S. He states that "an acoustic impedance mismatch between transducer, ear canal, and eardrum" is causing a resonance that results in a large peak at 7.5kHz, coloring the sound. He and a friend of his also experienced the same effect when using a pair of old Sennheiser HD414s. (For the record, I'd wager good money this is the primary reason why so many people cannot tolerate the ER4S.)
I too have noticed this, with my HD650s, ER4Ss, and even my STAX headphones. Anyone is susceptible to this effect, and unless your headphone's inherent frequency response happens to match your personal resonance frequency, you are likely already experiencing the effect. Even very high-end headphones will exhibit this problem. Take for example this Headroom graph of the AKG701:
It looks more or less neutral, right? But in reality, the actual perceived response looks more like this:
This graph is the raw frequency response data from HeadRoom's own dummy head, before the dummy head's HRTF (Head-Related transfer function) data has been subtracted from it. While it is not at all indicative of the headphone's actual frequency response, it is indicative of the dummy head's perceived response, that is, what the dummy head actually heard at the time of testing, which is what matters. And the dummy head's perceived response is very interesting indeed. Look at these graphs:
The top one is the raw data from the DT880, the bottom one is from the HD650. Notice that they both have a peak in the upper midrange, just like the K701, and at the same amplitude as well. Not only do they have a peak in the upper midrange, but the high frequencies in general are greatly uneven and exaggerated. And the same anomaly will be present in any headphone you could think to test. Because these graphs represent the frequency response of the headphone before the dummy head's HRTF has been subjected from it, it is they, not the nice graph at the top, that most represent what you will actually hear when using these or any headphone. Look at them. Is that really how you want your music to be portrayed? A large peak in the upper midrange drastically colors the sound and strongly masks the high frequencies, causing an overall muddiness and a lack of clarity. Cymbals, strings, and other instruments with high frequency content and/or overtones will be overrepresented, and their sound will be distorted and unnatural. Too much hi-mids and treble distort the perceived distance of the sound. Equalizing the high frequency response restores realism and spaciousness.
This tutorial assumes several things:
1. That you would like to equalize your headphones to a flat or nearly flat response, either to listen to them that way, or to use that as a reference point for further equalization.
2. That you have at least a mid to high-end pair of headphones with a relatively smooth response. (a headphone with a very jagged response, like Grados for example, will be more difficult to equalize to flat than a pair of Sennheisers, AKG or STAX). You can equalize any headphone with this technique, but some will be more challenging than others.
3. That you have an audio playback program that supports the use of a parametric equalizer of some kind, or a hardware parametric equalizer. I will provide links to several good software EQs at the end of this post.
There are several things you will need.
1. A sample of Pink noise, a sine wave sweep, and an ingenious little program called "SineGen". I will provide these at the end of the post. The reason pink noise is often used for equalization (especially equalization by ear) has to do with its unique properties and the properties of the human ear. Here is an excerpt from Wikipedia concerning pink noise:
Quote:
| Originally Posted by Wikipedia The frequency spectrum of pink noise is flat in logarithmic space; it has equal power in bands that are proportionally wide.[3][2] This means that pink noise would have equal power in the frequency range from 40 to 60 Hz as in the band from 4000 to 6000 Hz. Since humans hear in such a proportional space, where a doubling of frequency is perceived the same regardless of actual frequency (40–60 Hz is heard as the same interval and distance as 4000–6000 Hz), every octave contains the same amount of energy and thus pink noise is often used as a reference signal in audio engineering. That is, the human auditory system perceives approximately equal magnitude on all frequencies. The power density, compared with white noise, decreases by 3 dB per octave (density proportional to 1/f ). For this reason, pink noise is often called "1/f noise". |
This means that if you equalize pink noise so that every frequency sounds equally loud, your headphones will have an essentially flat response, and will sound as good as they possibly can with all types of music. The sine wave generator will be used in conjunction with the pink noise. It will allow you to find response peaks with great precision by sweeping the frequency of the waveform up and down and listening for increases in amplitude on certain frequencies.
2. A good parametric equalizer. A graphic equalizer is not accurate enough for what we are about to do. There are several excellent PMEQs available for use with programs such as Winamp or Foobar2000. In my opinion, the best one by far is Electri-Q. Is has the most features and is without a doubt the most intuitive to use, with its WYSIWYG visual interface. At the bottom of the page I have included a link to the free version. (Note that it lacks many of the features of the full version.) A hardware parametric equalizer will work just as well and has the added advantage of applying the response to all of your audio, not just audio played in your media player.
3. Patience. You will not get the perfect response on the first try. It may take a while to tweak and perfect your personal response curve for a particular headphone. But the results are well worth it and you will be surprised that you actually used to listen to them unequalized.
Now, to begin. For now we are primarily going to focus on removing peaks, rather than filling notches. Peaks are far more noticeable and detrimental. Any notches that you find can be filled in later. I am also going to focus on the equalization of high frequencies in this tutorial, because I believe that high-frequency response peaks are far more detrimental than bass peaks. That, and most headphones have a relatively smooth (if not quite flat) bass response. A small bass boost will not harm the sound and can even make it seem more natural. That being said, this technique can be used for any frequency range and you should feel free to equalize the bass and mid frequencies in the same manner you do the highs.
Now, the first thing you will need to do is load up several average volume songs, and set the volume to your normal listening level. Our perception of high and low frequencies increases with volume, and it is important to create our equalization with this in mind. Once you are finished, load up the sine wave generator. By clicking the "Power" button and moving the frequency slider up and down, you will generate a sine wave that is smoothly sweepable by hand. Listen very carefully and try to determine where there are sharp, sudden increases in volume. The bass should be more or less smooth, with peaks in the response becoming noticeable after 1kHz or so. Pay careful attention to the area between 6 and 8kHz, as in my experience most ear canal resonances occur in this area. (My personal resonance is usually around 7400hz. Linkwitz's was 7500hz, and his friend's was 6800hz, although depending on the headphone/bud in question it could be as low as 5kHz. There will probably be more than one peak. Listen carefully!) Using SineGen, it should be a very simple task to determine the center frequencies of the peaks. Once you find a group of frequencies that are noticeably louder than the surrounding frequencies, use the up and down arrow keys to slowly search up and down until you find the loudest frequency. This is the center of the peak. Keep in mind that you have the ability to create a list of frequencies by selecting one and clicking the plus button. Each frequency can have its own amplitude setting. Once you have found the resonant peaks, it is possible to create a list that contains a reference frequencies (say 500hz and 1000hz) to compare to the resonant frequency at several different amplitudes. Here, take a look:
Here I am comparing 500 and 1000hz to different levels of 7500hz. Higher level numbers equal lower amplitudes (kind of counter intuitive, but whatever). By quickly switching back and forth between my reference frequencies and the resonant frequency I can quickly discover which amplitude is the correct one and create my equalization based on that.
Now it is time to get down to business. Load up your audio playback program and parametric EQ, and open the pink noise file. There are three settings that you can alter with parametric equalizers. The frequency you are working with, the amplitude of the cut or boost, and the width of the effect. Every PMEQ plugin works differently, and I cannot give instructions for all of them, so you will have to figure out some things for yourself. But I can guide you a little. What you will want to do is create a peaking filter with it's center frequency being the center frequency of the peak you found using SineGen. For example, if the effect is occurring at approximately 7.5kHz, place the center there. When you are ready, begin lowering the amplitude of the peak filter one decibel at a time, until you can no longer hear the high frequency peak. Now, here is the important part. Load up a song and listen to it for a moment. Listening to pink noise for extended periods of time is hard on the ears, so we will take a moment to cleanse your aural palette, so to speak. In the meantime, try taking the equalizer in and our of the signal path a few times to see what kind of effect the resonance reduction has on your music. When you are finished, reload the pink noise sample and move the amplitude slider for your center frequency back up one or two decibels. You should be able to hear the difference. Now, continue moving it downward again until you can no longer hear the "prominent hiss". In all likelihood, your setting will be lower now than it was before you loaded the song.
Once you are finished and are satisfied with your setting (it will probably be around -7 to -8db; the notch depth does not seem to vary much between individuals) we will need to adjust with width of the notch we have created. Set the notch to it's narrowest setting, and gradually increase its width in small increments until you can no longer hear the anomaly. Load up a song to rest your ears, and then repeat the process until you are satisfied that you have the correct width. At this point you may want to check the amplitude of your notch again. Once you are finished with all of this, load up the sine wave sweep file (included with the pink noise) in your media player and play it. With any luck, the response peaks you noticed earlier will be either gone or significantly reduced. Try comparing the output of your media player with the output of SineGen. With practice and time, you will be able to achieve a uniform response. If you have a hardware parametric equalizer, you can use the output of SineGen to directly create your equalization by tuning your equalizer in real time while sweeping the frequency slider.
As I mentioned earlier, there may be more than one peak, and the process will need to be repeated for all of them. Using the exact technique described above, this is the response that I currently have for my STAX headphones:
Mode: Linear Phase
Peak type: S-plane type II
(I always use the same mode and peak type, BTW)
-8.0dB at 7450Hz with a BW of 0.750
-9.5db at 12850Hz with a BW of 0.950
(Note that this response will probably work with any Lambda series headphone, from the original Lambda all the way to the SR-404, because they all have the same formfactor and, hence, the same transducer-to-eardrum distance.)
If you want to know what the perceived unequalized frequency response of my headphones was, just imagine those notches as peaks! As you can see, this is a huge change from a normal, flat response! Keep in mind that as electrostatic headphones, the actual transducers probably have an essentially flat response. A headphone that already had peaks in the response would be even worse. Setting either of the center frequencies back to 0dB reveals an extremely prominent coloration of the sound, which is blatantly noticeable when listening to pink noise. When listening to music, setting the 7400kHz notch to 0 reveals an overall sandy coloration to the sound, with louder than normal cymbals and string overtones. Male and female vocals are strongly affected and sound artificial. Setting the 12.85kHz notch to 0 reveals a gross prominence of very high frequency overtones of strings and voices, and causes metal instruments such as cymbals, triangles, bells, etc to sound artificially shiny and tingy. Turning both of them off results in a stupidly exaggerated high-frequency response overall.
The end effect of such a frequency response is a constant bombardment of high-frequency information and a loss of true fidelity. Unless you've spent a good deal of time with a system that has a very flat response (such as a good pair of studio monitors), it is difficult to appreciate just how much of an effect it has on your music. So here is my advice to you: if you actually go through with this and create your own personalized response, do not constantly change back and forth between it and the unequalized response to compare the two. Instead, spend a week or so listening only to your equalized response. Then, load up the pink noise file (or a song, although the noise will have a greater effect) and after a few seconds of listening, turn the filter off. You will almost certainly be amazed. Amazed at just how badly your headphones were distorting the sound, and amazed that you actually listened to them that way! I know I am! In addition to hearing music with greatly increased fidelity, I have also been able to increase my overall listening volume; without the high volume high-frequency peaks, my comfortable listening level is a few dB higher than it was before.
Before I close, I have a final request: if anybody should actually go through with this, I request that you post your results for everyone to see. If you choose to use Electri-Q, post a picture of your response. If you used another program, tell us which one and post the settings you use. Not only would it be interesting to see the different personal responses of people's ears, but the information will be useful as starting points to others who want to equalize their own headphones.
Now, here are some useful links:
Pink noise and sine wave
SineGen sine wave generator
Electri-Q parametric equalizer Freeware Version
Shibatch parametric equalizer for Winamp (Can be used with Foobar if you have a Winamp to Foobar wrapper. See below.)
NWEQ parametric equalizer plugin (Relatively intuitive to use, no visual feedback on waveform changes, though.)
NyquistEQ Parametric Equalizer
George Yhong's VST wrapper for Foobar
Winamp bridge for Foobar2000


