


toxicrocker
New Head-Fier
Wow, that's mean.
LOL! Dont get me wrong, I love a good rhinestone, just not on this headphone cable.
Wow, that's mean.
Oh, in that case just jump the ring and sleeve connections. Technically not needed, you can just use the tip and sleeveI wanted to go with the double jack and just used the two TRSs
I found the threads on here about the HD280 "blue tak" mod helpful in taking apart my set to add a jack so I thought I reciprocate and post a thread showing how I added a jack to replace the built-in cord.
Update: Executor32 found a really nice headphone jack on Amazon, I've quoted his post here so you can all see it sooner.
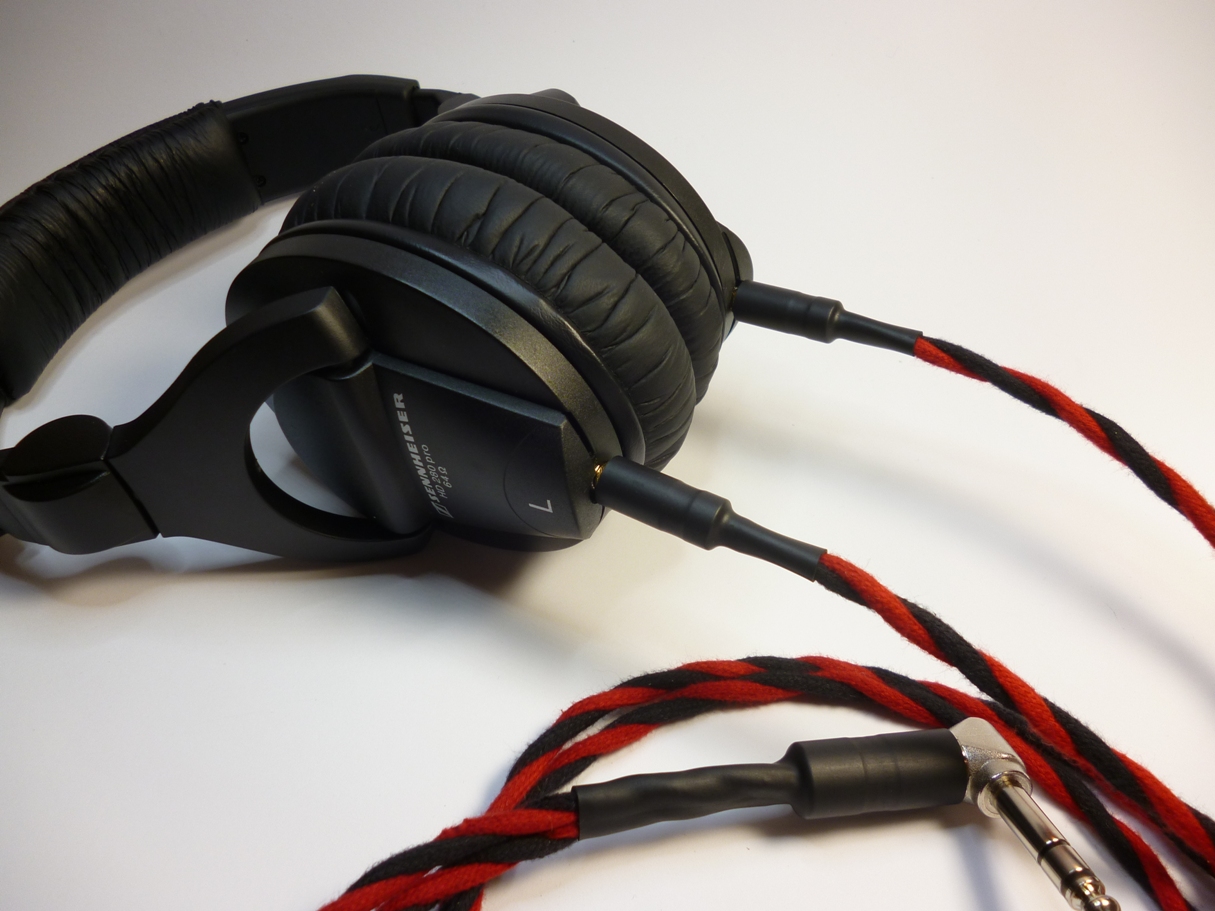
I have had my 280's for a few weeks now and love 'em. They block out lots of noise and don't hurt they way the RS 120's did (because the don't sit ON my ears). However I didn't like the coiled cord that came with them. My full intention is to use the RS 120 guts to make the 280's wireless but that will be for another time. In the mean time I wanted to remove the coiled cord and make it possible to use any cord. I've seen mods where all but a few inches of the cord are removed and a male jack is added. This means you can use whatever extension cord you have but they are removable. I didn't like this because it's not very clean and because of my final goal of making them wireless. So without further ado here are the pic's of my conversion.
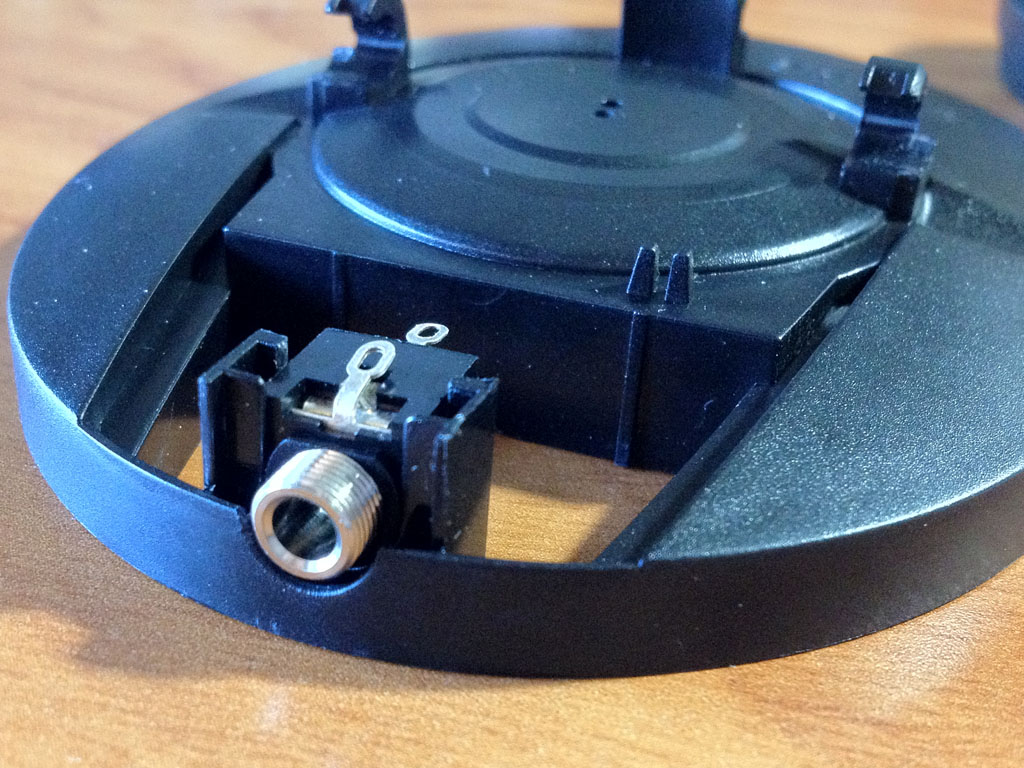
1. There are lots of thread about how to take these apart so I'll skip that step. Here is the left shell with the cover in place. This is the part that we'll need to modify.
2. The panel removed.
3. This is the jack we'll be transplanting into the headphones. It's a radio shack part, nothing special. After opening the set I discovered that it's almost like this was intended. With only a little plastic removal I was able to get a perfect fit. I only thought to take pictures after I made the cuts so I have no before pictures. The bit I removed looked just like the U shaped part you see here.
4. A test fit. This is too good to be true.
5. Here is another shot from the top of the test fit.
6. There is a little bit of plastic that needs to be removed from the underside of the cover as well but it's easy to do. I recommend scoring it with an x-acto knife and then using a pliers to break it off. It makes a very clean cut that way.
7. I used the x-acto knife to crosshatch the jack so the epoxy would have more to grab onto. Here you can see the epoxy.
8. All back together. You'd never know that it wasn't stock.
Thanks for reading. Hope I've inspired you to do your own mod.
-Trevor
HiI found the threads on here about the HD280 "blue tak" mod helpful in taking apart my set to add a jack so I thought I reciprocate and post a thread showing how I added a jack to replace the built-in cord.
Update: Executor32 found a really nice headphone jack on Amazon, I've quoted his post here so you can all see it sooner.
I have had my 280's for a few weeks now and love 'em. They block out lots of noise and don't hurt they way the RS 120's did (because the don't sit ON my ears). However I didn't like the coiled cord that came with them. My full intention is to use the RS 120 guts to make the 280's wireless but that will be for another time. In the mean time I wanted to remove the coiled cord and make it possible to use any cord. I've seen mods where all but a few inches of the cord are removed and a male jack is added. This means you can use whatever extension cord you have but they are removable. I didn't like this because it's not very clean and because of my final goal of making them wireless. So without further ado here are the pic's of my conversion.
1. There are lots of thread about how to take these apart so I'll skip that step. Here is the left shell with the cover in place. This is the part that we'll need to modify.
2. The panel removed.
3. This is the jack we'll be transplanting into the headphones. It's a radio shack part, nothing special. After opening the set I discovered that it's almost like this was intended. With only a little plastic removal I was able to get a perfect fit. I only thought to take pictures after I made the cuts so I have no before pictures. The bit I removed looked just like the U shaped part you see here.
4. A test fit. This is too good to be true.
5. Here is another shot from the top of the test fit.
6. There is a little bit of plastic that needs to be removed from the underside of the cover as well but it's easy to do. I recommend scoring it with an x-acto knife and then using a pliers to break it off. It makes a very clean cut that way.
7. I used the x-acto knife to crosshatch the jack so the epoxy would have more to grab onto. Here you can see the epoxy.
8. All back together. You'd never know that it wasn't stock.
Thanks for reading. Hope I've inspired you to do your own mod.
-Trevor
Hi
This seems to be what I'm looking for for my 280s but for some reason the pics in your post aren't appearing anymore (on phone or laptop). Is it just me? Any chance you could repost the images?
Looks like they did some sort of image moving and my post didn't get automatically upgraded. Thanks, I've updated the post to point to the images again.


")
Joining the 280 Pro Cable Mod Club
Feels a lot better with a custom cable, all the weight pulling them down is gone. There's still some microphonics though and I'm gonna try and put some rubber around the connector to see if I can dampen it.
Damn I'm surprised at how much I enjoy these headphones.

Very clean! Well done.
I also had that issue. I used a braided cable (which was great for preventing snags) but when it rubbed on the edge of the table it would send that vibration straight into the headphones. I wonder if getting a short extension cable would work to absorb some of that...
Something like this:
https://www.cmple.com/3-5mm-stereo-audio-headphones-mini-plug-extension-cable-6-inches


I mentioned this in my own comment further up the page. When I wired it up as you described, which is what it seemed to be correct according to the wiring of the original cable and that little circuit board it connects to, one of the drivers was out of phase with the other and it sounded exactly like you described. I had to swap the polarity on one of the drivers (i.e. its reddish wire tied to the other driver's bare copper wire, and its own bare copper wire tied to the tip/ring) to fix it.Hi,
I know this is an old thread now, but can anyone confirm the polarity of the wiring from the drivers?
I did the mod by removing the circuit board and tying the two copper wires together, and then to the sleeve part of the 1/8 jack, and the reddish/copper wires to the tip and ring.
I am wondering if that could be reversed polarity as the sound seems different. Left and right balance is fine, just seems to have less bass and clarity.
Jon
Thanks Executor32 I did read your post and it made me think I probably had the same issue. Do you remember which side of yours was out of phase? For mine I believe it is the left side. It is hard to believe they would be so silly as to wire them differently on each side.I mentioned this in my own comment further up the page. When I wired it up as you described, which is what it seemed to be correct according to the wiring of the original cable and that little circuit board it connects to, one of the drivers was out of phase with the other and it sounded exactly like you described. I had to swap the polarity on one of the drivers (i.e. its reddish wire tied to the other driver's bare copper wire, and its own bare copper wire tied to the tip/ring) to fix it.
It doesn't really matter which one you reverse the polarity on since they're both out of phase in relation to the other; reversing the polarity on either one will bring them back in phase and everything will sound normal, even if both may end up technically being wired "backwards".Thanks Executor32 I did read your post and it made me think I probably had the same issue. Do you remember which side of yours was out of phase? For mine I believe it is the left side. It is hard to believe they would be so silly as to wire them differently on each side.
On my headphones I notice the left side seemed weaker and had a slight crackle at low frequencies. So I reversed the polarity on that side and I am back to thumpy goodness.It doesn't really matter which one you reverse the polarity on since they're both out of phase in relation to the other; reversing the polarity on either one will bring them back in phase and everything will sound normal, even if both may end up technically being wired "backwards".
